Why did we create the Data Populator?
Do you have a large amount of data you want to add to the Intuition System, but not enough time or patience to manually create each data point as an atom or triple in the Portal? Look no further! The Data Populator V1 is here!
What it does, in brief
You can use the Data Populator to load CSV files which contain long lists of atom data. The user interface will allow you to perform some basic proofreading of the data, and when you’re ready you can submit it to the Intuition System in one fell swoop. This works by batching all of the atom data together into very large EVM transactions, after automatically pinning and filtering the metadata onto IPFS. This is very similar to the behavior in the Portal App, except it’s designed to work with much larger volumes of data.
Where you can access it:
There are two deployments for the Data Populator - one for testing, which runs on Base Sepolia, and one for production which runs on Base.
You can visit the Testnet Data Populator here:
https://data-populator-dev.onrender.com
And the Mainnet Data Populator here:
https://upload.intuition.systems
It’s strongly recommended, especially for first time users, to start off with the Testnet version to verify everything looks good with your data before spending real Base Ethereum on populating it. Please read this guide before using it.
Instruction Guide
The first thing you will need to do, if you haven’t already, is authenticate and log into the system. If you are not authenticated yet, you will be shown this Connect button:

Click the connect button and authorize using your method of choice. Follow the prompts shown on screen to complete the log-in process.
Now that we’ve gotten that out of the way, here is a run-down of the User Interface, which you should see after logging in:
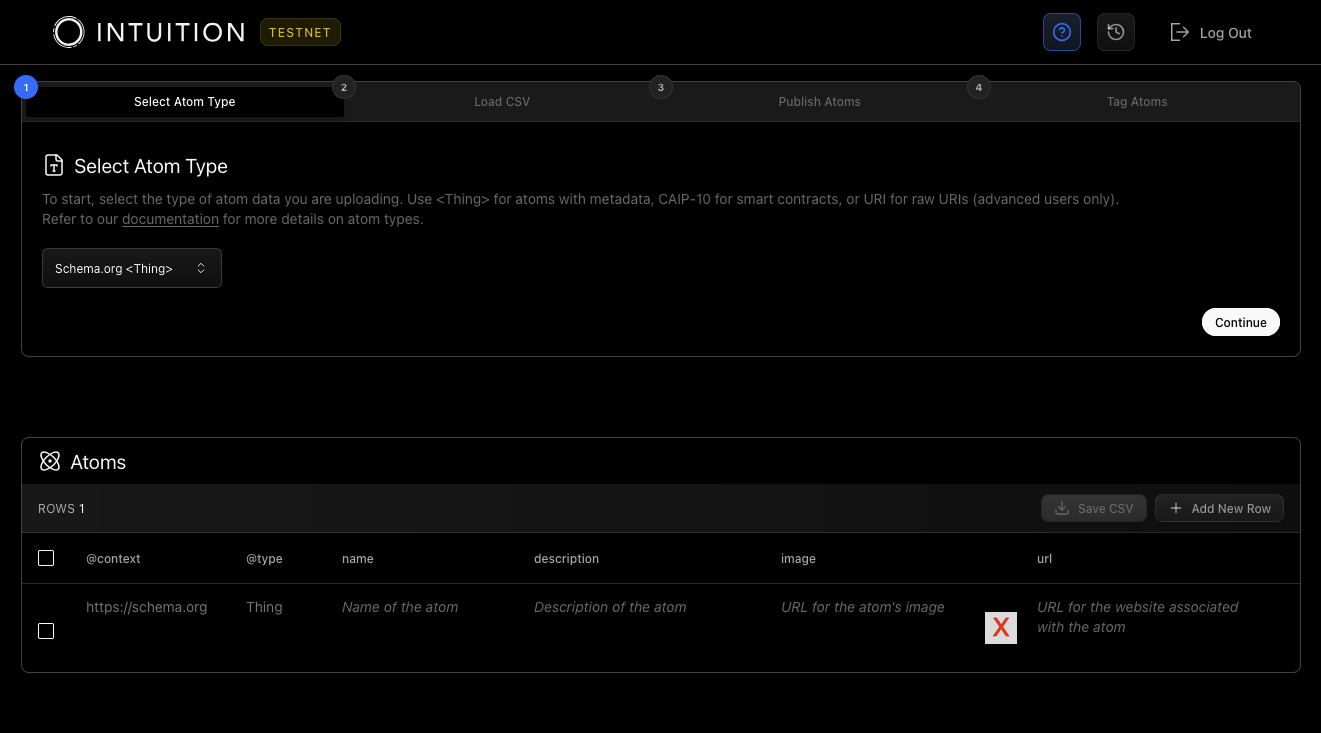
The top menu bar contains several buttons: A helpful tooltip toggle button and a history button. It also shows which version of the Data Populator app we are using - in this case we are using the TESTNET version connected to Base Sepolia.

Beneath the top menu bar, you’ll find a box with four tabs: Select Atom Type, Load CSV, Publish Atoms, and Tag Atoms. They are ordered 1-4 because this is the typical order of operations that most users will use. We will explain these four sections in detail.

Select Atom Type

As of right now, you have 3 options here. Most users can stick with the default value of Schema.org <Thing> to create and tag basic metadata atoms. If you want to populate CAIP-10 atoms or Raw URI atoms, you can select either option from the drop-down before pressing Continue. We will explain each type below.
Schema.org <Thing>

We currently support 1 type from schema.org, the <Thing>. Most of the atoms in the Intuition Portal are <Thing>s. Support for many schema.org types and others will be added in the future as our system continues to grow. The <Thing> has 6 fields:
| @context | This will always be https://schema.org - it’s used to identify where the metadata type is defined. |
|---|---|
| @type | This will always be Thing - it’s used to determine which metadata type is being used. |
| name | This is the name of your atom. This could be the name of an article, person, place, or thing. |
| description | A description of your atom. This is a more in-depth blob of text which helps people understand the thing being referenced. |
| image | A URL pointing to an image for your atom. This might point to a logo, a twitter avatar, or anything which visually demonstrates the thing being referenced. This image will be filtered through content moderation before being published by the Data Populator. |
| url | A URL pointing to a website for your atom. This could be a social media profile, the website for a business, an article, or anything else on the web. |
CAIP-10

A CAIP-10 is a string of text which is used to reference smart contracts. CAIP-10 atoms comprise of only one variable, the CAIP-10 itself. The CAIP-10 identifier is comprised of 4 : delimited values:
CAIP10 : [NAMESPACE] : [CHAIN_ID] : [ADDRESS]
This allows us to refer to pretty much any smart contract on any chain. Examples:
# Ethereum mainnet (canonicalized with [EIP-55][] checksum)
CAIP10:eip155:1:0xab16a96D359eC26a11e2C2b3d8f8B8942d5Bfcdb

# Bitcoin mainnet
CAIP10:bip122:000000000019d6689c085ae165831e93:128Lkh3S7CkDTBZ8W7BbpsN3YYizJMp8p6

# Cosmos Hub
CAIP10:cosmos:cosmoshub-3:cosmos1t2uflqwqe0fsj0shcfkrvpukewcw40yjj6hdc0
If you input or load a CAIP-10, its address will be automatically checksummed by the Data Populator.
You can read more about the CAIP-10 standard here:
https://chainagnostic.org/CAIPs/caip-10
In the Intuition System, CAIP-10 URIs must include an additional CAIP-10 prefix - this is to delineate it from other types of URIs.
Raw URI

The Intuition System also uses Raw URIs. These cannot be proofread, and are for advanced users only. One example use case for these is the https://schema.org/keywords Raw URI. The Intuition Portal uses this as a Predicate in Semantic Triples in order to denote that something has a Tag Keyword. For example, we might compose this Semantic Triple :
Intuition Has Tag Bullish
The above Semantic Triple is using Intuition for the Subject, https://schema.org/keywords (Has Tag) for the Predicate, and Bullish for the Object.
If this is confusing at all, please don’t worry too much about it and continue reading on. Refer to our documentation for in-depth explanations of the core Intuition concepts.
Load CSV

The Load CSV box allows you to load a .csv file from your PC which contains numerous Atoms. A typical Schema.org <Thing> .csv file might look something like this:
@context,@type,name,url,description,image
https://schema.org,Thing,Google,https://www.google.com,"A website where you can search for stuff.",https://google.com/google_logo.jpg
https://schema.org,Thing,Facebook,https://www.facebook.com,"A social media website.",https://facebook.com/facebook_logo.jpg
The above example shows a .csv encoded with two atom rows. First, there is a header, followed by carriage return delineated lines of comma delineated cells. Note that any cells which contain commas must be enclosed in “quotation marks”. If you exported your .csv file from an application like Google Sheets, Microsoft Excel or Apple Numbers, your .csv will automatically be encoded this way.
If you are loading a .csv file of CAIP-10 atoms or Raw URI atoms, the encoding will be a bit simpler. Here is an example of a CAIP-10 encoding:
CAIP10
eip155:1:0x1234567890abcdef1234567890aBcdef12345678
eip155:1:0x1234567890abcfeF1234567890aBCDEf12345675
eip155:1:0x1234567890aBcdeF1234567890AbcDef12345672
Since there is only one column, CAIP-10, no commas are needed - the carriage return is sufficient for the application to delineate the cells.
Once again, the encoding is not something that you will probably have to worry about because if you are using a spreadsheet application it will encode the .csv in this manner automatically. The column order, capitalization, and naming is crucial though - so please ensure it matches the specification before exporting.
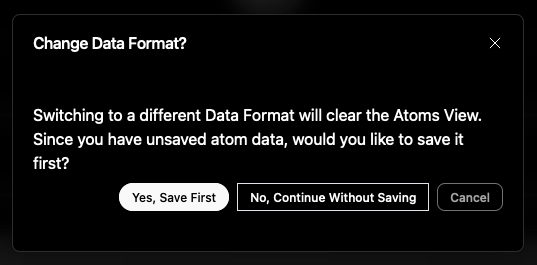
When you load a .csv file, the Data Populator will automatically determine its Atom type from the header. If you currently have unsaved changes in your Atoms list in the application, you will be shown the dialog above. Otherwise, it will just load the file and show you the contents in the Atoms View.
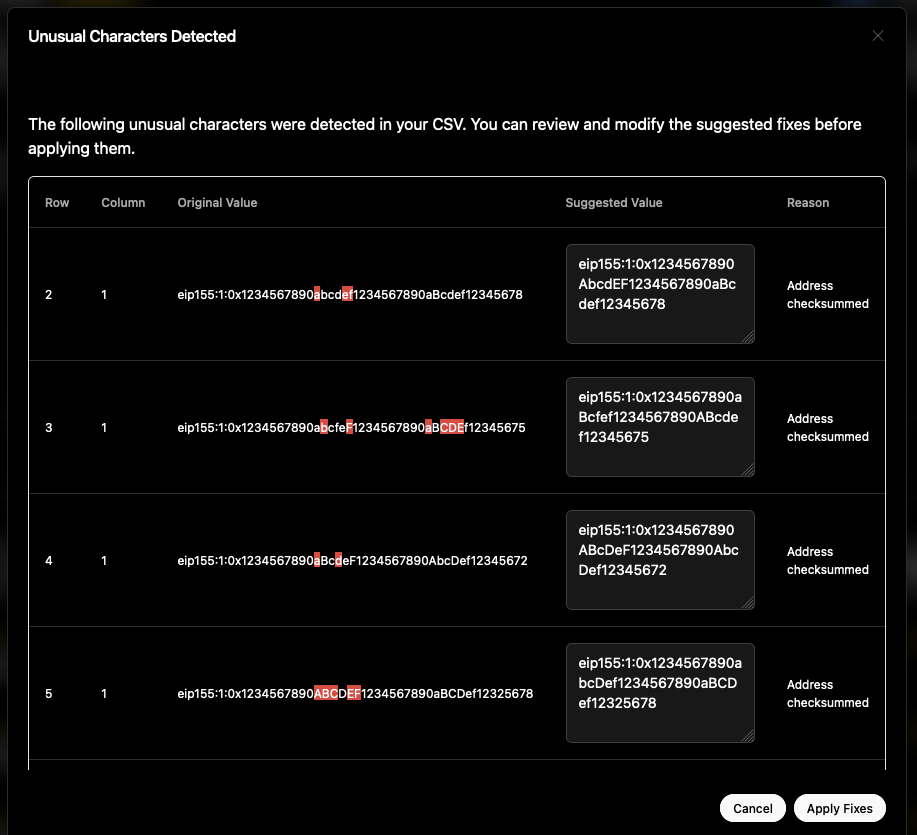
If there’s anything weird going on with your .csv file, the Data Populator will show you a Proofreading window which flags any unusual characters, escape sequences, or in the case of CAIP-10s, incorrectly checksummed addresses. It will attempt to fix any errors on its own, and can automatically checksum Ethereum addresses, but if you see any other Reasons listed it’s suggested to review the data and correct the Suggested Value if needed. Since many data sets are edited and compiled by automated tools AI or webcrawlers, weird characters can sometimes slip through the cracks.
If this window appears and you need to apply fixes, it’s suggested to click the Save CSV button to save a copy of the corrected .csv data.
Once you’ve loaded in your Atom data, you can publish it.
Publish Atoms

The Publish Atoms tab shows you some basic information about the Atoms you have loaded. Once you’ve reviewed them, you can select them and publish them using the Publish Selected Atoms button. Before explaining that, we’ll take a slight detour and go over the Atoms View.
Atoms View
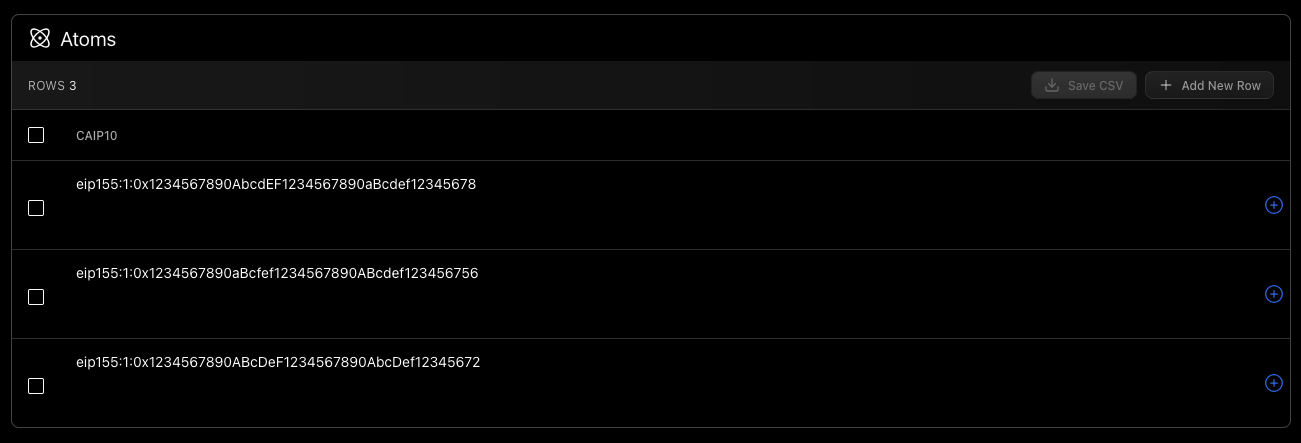
The Atoms View appears below all four tabs in the application, and displays the Atoms you currently have loaded. It has some nifty features. Using the Atoms View , you can edit and preview the data.

Cells can be selected and freely edited. Here, we are using the Schema.org <Thing> Atom type, and changing the name of one of the Atoms. When working with Schema.org <Thing>, you will see a preview of the image metadata next to the image url.
You can sort the data by clicking on any column header. This is useful for identifying any rows which may have similar data, but not exact matches. With the abundance of automated web-crawlers and AI tools, items often get added to lists duplicatively and we want to ensure it’s relatively easy to identify partial duplicates before publishing.

Here, we sorted the Atoms by name - and found two Atoms which were not automatically detected as duplicates when loading the .csv file. Upon comparing the fields, we see that these are in fact duplicates - but their descriptions differ by a single word. We can select the row we don’t want using the checkbox on the left, and press the Delete Row button to remove it.
Once you have made any edits to the data, you can press the Save CSV button to save a new copy to your PC.

The Data Populator keeps track of the edited status of the Atoms and enables you to Save CSV if the data has been modified in any way from its initial state.
You may also manually Add New Row if you want to enter in your Atom data directly into the Data Populator.
Back to Publish Atoms
When you are ready to Publish your Atoms, you can select them using the checkbox on the left of their rows. The top-most checkbox will select all of them at once.
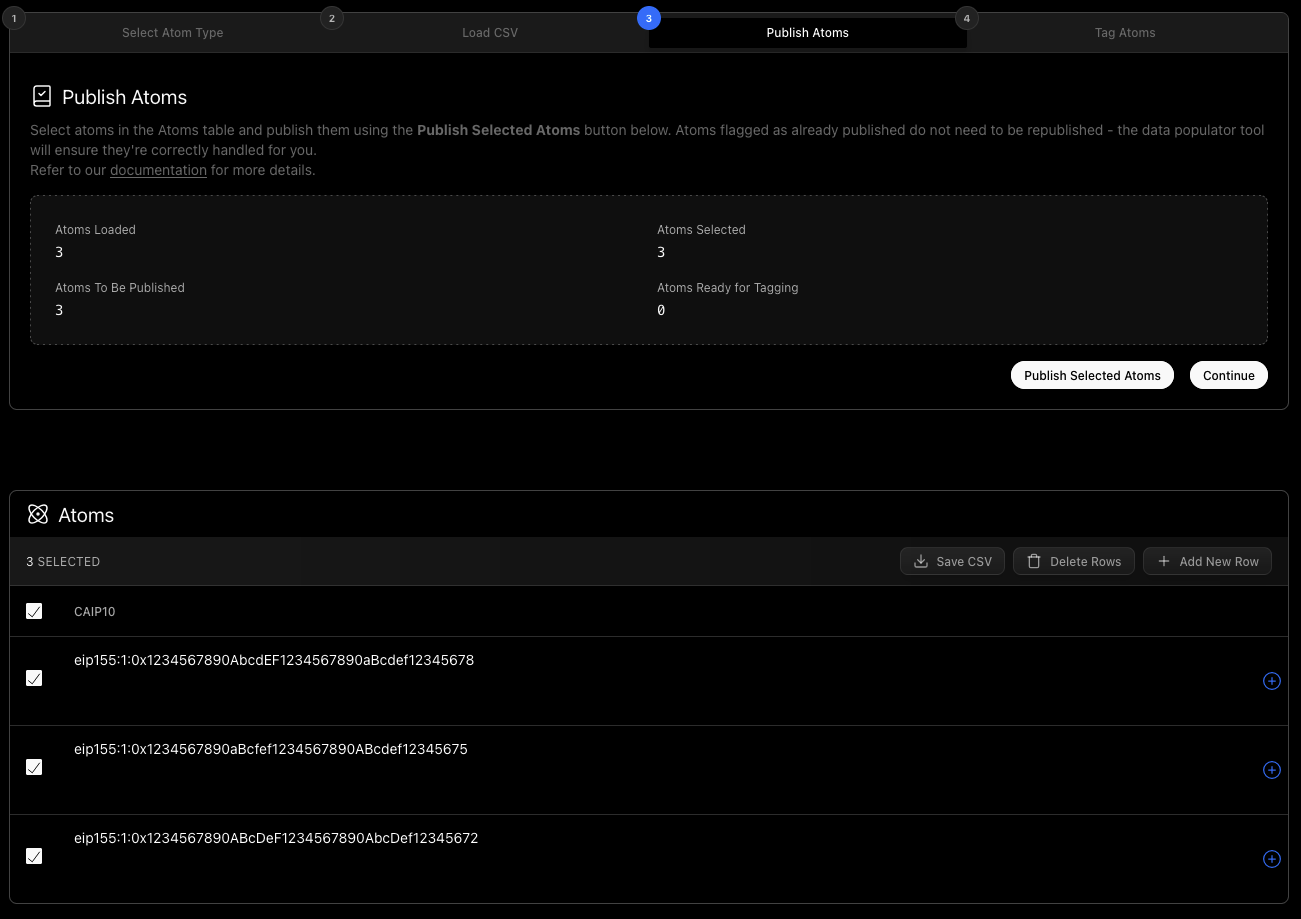
On the far right side of the row, you will most likely see a blue + icon with a circle around it. These icons indicate that the Atom data does not yet exist in the Intuition system. In this example, we will select 3 Atoms and press Publish Selected Atoms :

First we will be presented with this confirmation dialog, which allows us to confirm that we want to publish 3 new Atoms. If one or more atoms that we selected were already published previously, the dialog will say something like “1 out of the 3 atoms you selected already exist, and 2 new atoms will be published. This will take about a minute.” The Atoms will be published using the minimum deposit amount, multiplied by the quantity of Atoms you wish to publish.
Publish Atoms Progress Dialog

The application will do some thinking behind the scenes and generate an EVM Transaction for us to sign. Ensure that you have adequate funds in your wallet before completing this step. After approving the transaction, a few moments will pass and you will be shown a confirmation:
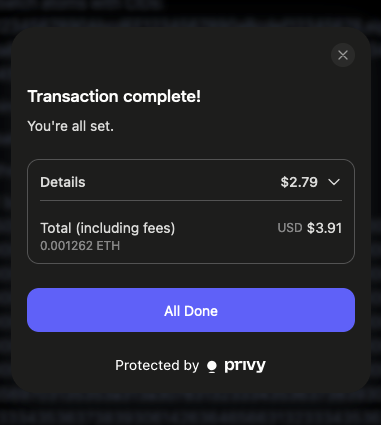
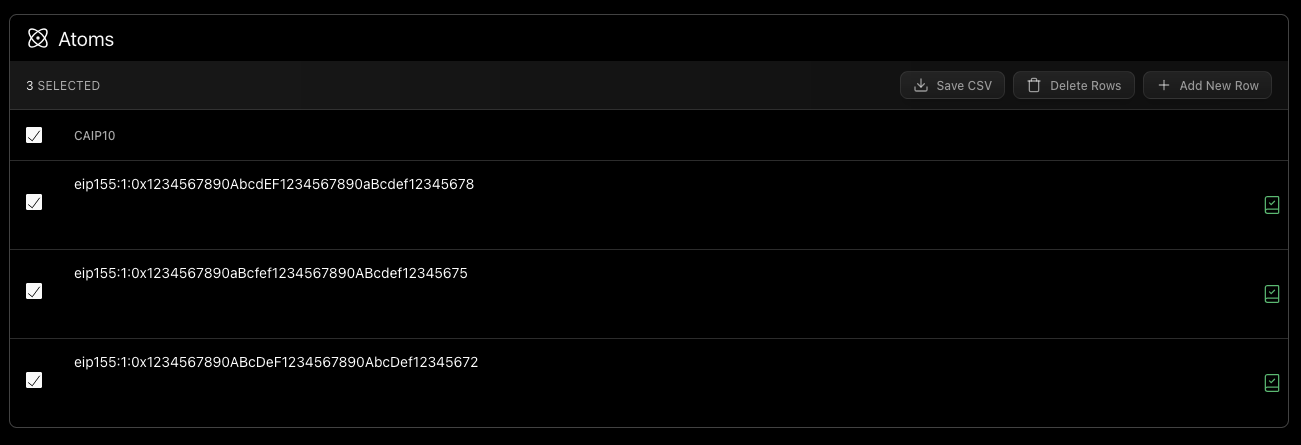
Press All Done to continue. The application will perform a sanity check to ensure that the Atoms are in the system, and the dialog will close. You should now see green Atom Already Exists icons on the right side of all your Atoms in the Atoms View :
Tag Atoms
If you want to add your newly published Atoms to a List, you can use the Tag Atoms feature:
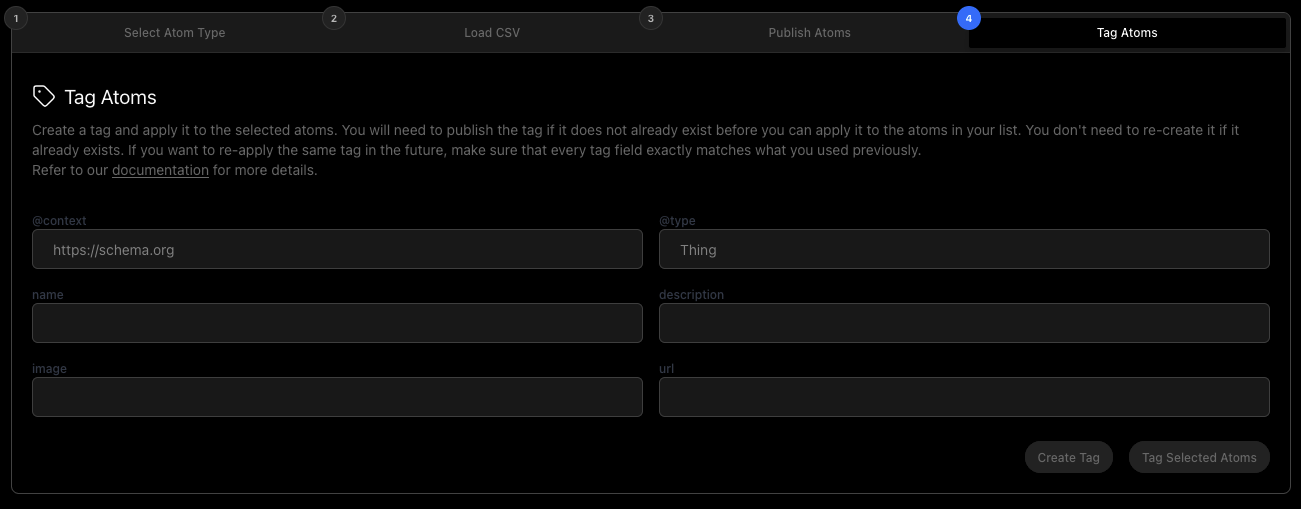
In order to do this, you must first create the Tag by filling out the above fields and pressing Create Tag . This publishes the Tag as another Atom in the system and enables you to associate your published Atoms with it. Once you’ve filled out the metadata and pressed Create Tag, you will be shown a similar progress window as before while the Tag is published. Once the Tag exists in the system, you can press Tag Selected Atoms to tag them.
It’s important to be precise while entering metadata. Each Atom's uniqueness is determined by the exact contents of its data. So if you’ve created a Tag in the past, and want to tag some new Atoms with it after reopening the application, you will need to enter the exact metadata that was previously used for its name, description, image and url in order for it to be seen as the same Tag in the Intuition System.
History Window

If you press the View Your History button near the top-right corner of the screen, a new window will appear:

This window shows a history of all the Atoms, Triples (Tags), and Requests that you’ve submitted using the Data Populator. You can even Save .csv files that you’ve previously submitted using the same Login - which can be helpful when working on multiple machines or collaborating with others:

Conclusion
We hope that this documentation has been helpful in answering any questions you may have had regarding the Data Populator tool.
The Data Populator tool is fresh off the presses, and we are working tirelessly to iron out any and all blips and aberrations in its functionality.
If any questions have been left unanswered, or if you run into any issues, please reach out to us on our Discord channel for assistance.